
A Step-by-Step Engineering Guide
Selecting the right arm isn’t about lifting weight—it’s about controlling it.
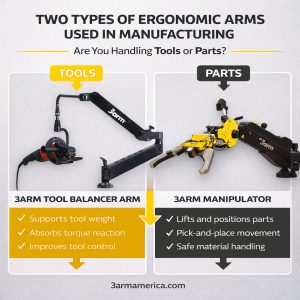
What a Tool Balancer Arm Actually Does (And What It Doesn’t)

A tool balancer arm is often misunderstood—especially when compared to lifting equipment.
A tool balancer arm is not designed to lift loads.
It’s designed to neutralize the weight of a tool and give the operator full control over it.
If your application involves lifting, rotating, or positioning heavy parts, you’re looking for a different solution—like the 3arm Manipulator.
For a deeper breakdown, this guide explains how a tool balancer arm works and when to use one.
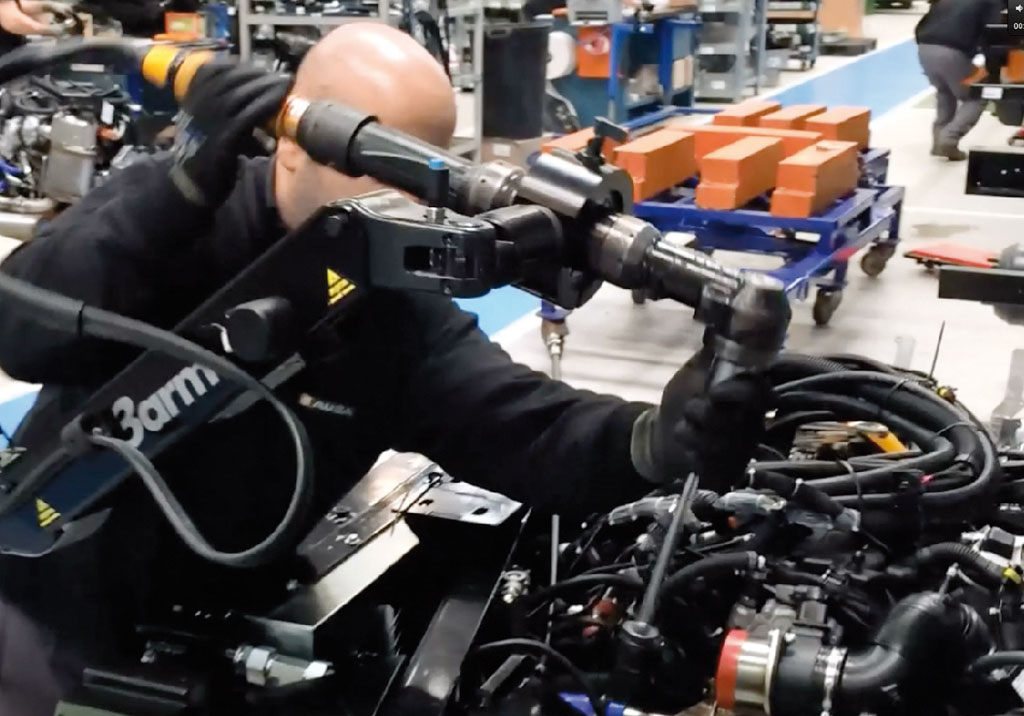
Step 1: Define the Tool (Real Working Load)
Most selection mistakes start here.
Engineers often size an arm based on the tool’s listed weight—but that’s only part of the story.
You need to account for:
- Tool attachments
- Hoses and cables
- Operator-applied force
- Tool orientation during use
A 12 lb grinder rarely behaves like a 12 lb tool in real conditions.
Over time, it can feel like significantly more.
If your goal is reducing strain during long shifts, this guide on how to support heavy power tools for long shifts breaks it down further.
Step 2: Understand the Forces in Your Application
Not all tools behave the same way—even if they weigh the same.
Identify which forces dominate your process:
Downward Force (Grinding / Sanding)
- Requires consistent, controlled pressure
- Benefits from smooth vertical compliance
Torque Reaction (Drilling / Fastening)
- Rotational forces must be stabilized
- Critical for both precision and operator safety
Precision Guidance (Finishing, Inspection, Metrology)
- Requires steady, low-resistance movement
- Stability is more important than force
- Especially valuable for optical tools, measurement devices, and inspection equipment that must remain controlled and vibration-free
The wrong arm doesn’t just feel wrong—it changes how the tool performs.
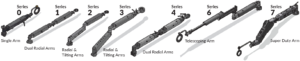
Step 3: Define the Full Range of Movement (Not Just Reach)

What really defines usability is the full range of motion and positioning flexibility.
Start with the arm structure:
Most systems use 2–4 joints, which may allow:
- Rotation only
- Or combined rotation + tilting movement
This determines how naturally the operator can position the tool.
Then consider the head (tool interface):
- Fixed head → stable, simple applications
- Rotating head → up to 360° positioning
- Tilting + rotating head → maximum flexibility for complex angles
Finally, look at mobility and mounting enhancements:
- Rail systems or swing beams for extended horizontal travel
- Elevator columns for vertical adjustment
- Mobile carts for multi-station use
It’s not just about reaching the part—it’s about reaching it at the right angle, every time.
3arm tool holding systems are configurable across a wide range. This is the capacity range of the arms without accessories:
- Vertical reach: 22–52 in
- Horizontal reach: 34–82 in
- Weight capacity: 22–132 lbs
- Torque handling: up to 1,200 Nm
You can explore configurations using the tool balancer arm selection tool
Step 4: Choose the Right Mounting Configuration
Common configurations:
- Bench-mounted → fixed, stable workstation
- Column-mounted → expanded range and flexibility
- Overhead-mounted → maximum access and clearance
- Mobile base/cart → flexibility across multiple stations
The right choice depends on how the operator interacts with the workspace—not just where space is available.
Step 5: Mechanical vs Pneumatic Systems (What Actually Matters)
Most 3arm tool holding systems are fully mechanical and do not require air or electric power to operate.
That’s a major advantage in many facilities:
- Simpler installation
- Lower maintenance
- Consistent performance
- Safety
Exceptions:
Some models (with L22 and L92 brake options) use pneumatic power for the brakes in addition to any supply needed to power your tools.
For tool balancing applications, mechanical systems often provide the most reliable and efficient solution.
Step 6: Match the Arm to the Application
This is where selection becomes practical.
Examples:
Grinding Applications
- Require controlled downward force
- Benefit from stable, consistent positioning
Fastening / Torque Tools
- Require torque absorption and stability
- Reduce operator strain and improve consistency
Finishing / Surface Work
- Require smooth, low-resistance movement
- Prioritize precision and control
For a real-world example, see how teams are using tool support systems in heavy-duty maintenance environments.
Common Mistakes When Selecting a Tool Balancer Arm
Most issues come from small oversights.
Avoid these:
- Selecting based on weight alone
- Ignoring range of motion and positioning needs
- Underestimating torque forces
- Over-restricting movement
- Skipping application-specific configuration
If your application isn’t straightforward, this breakdown of engineering support and customization in tool balancing systems explains why that matters.
Quick Selection Checklist
Before choosing a system, confirm:
- Tool weight (including attachments)
- Type of force (downward, torque, precision)
- Full range of motion required (not just reach)
- Mounting constraints
- Process variability
- Operator workflow
What Happens If You Get It Wrong?
The impact shows up quickly:
- Operator fatigue increases
- Precision drops
- Inconsistent results
- Increased risk of injury
- Slower overall productivity
This real-world example shows how correcting the setup improved both safety and performance.
Tool Balancer vs Manipulator: When You Need More Than Tool Support
If your application involves lifting or positioning parts—not just supporting tools—you need a different type of solution.
That’s where manipulators come in.
Learn how industrial manipulators improve productivity and handling efficiency.
Frequently Asked Questions
What size tool balancer arm do I need?
It depends on working load, range of motion, and application forces—not just tool weight.
Can a tool balancer arm support precision tools?
Yes. They are ideal for stabilizing tools that require steady, controlled positioning—including inspection and metrology equipment.
What’s the difference between a tool balancer and a manipulator?
A balancer supports tools. A manipulator lifts and moves loads.
What’s the difference between a tool balancer and a torque reaction arm?
A torque reaction arm is typically a tool balancer with a torque absorption rating
Do tool balancer arms require air or power?
Most mechanical systems do not. Some models include pneumatic braking features.
How do I determine the right range of motion?
Evaluate how the tool needs to move and orient—not just how far it needs to reach.
Final Thought
A tool balancer arm isn’t about making a tool lighter.
It’s about giving the operator complete control—every second of the shift.
Need Help Selecting the Right Setup?
If you’re not sure what configuration fits your application:
Explore options using the tool balancer arm selection tool.
Or share your tool, process, and workspace—we’ll help you size it correctly.
Contact Us
